Add React Hot Reloading to create-react-app

I love create-react-app. I’ve used it as the boilerplate generator for the last 4 projects I’ve worked on. I’ve tried other React boilerplates, but always come back because of it’s great foundation, as well as it’s ability to be ejected and customized.

One thing I miss dearly is hot reloading. React Hot Loader is, in my opinion, one of the killer features of React that makes it better/faster to develop with than any other front-end technology I’ve ever used. There’s no canonical way to add hot reloading into create-react-app, so here’s my method of adding it.

Note: In the next few days I’ll also go over how I add things like Sass, Redux, and react-router to create-react-app.

Another Note: This involves “ejecting” the app, and that’s an irreversible action. Be sure you want to eject before you actually do. Read more about ejecting create-react-app.

Alright, let’s do this.

Installation

  1. If you’re unfamiliar with create-react-app, you install it by running
    npm install -g create-react-app
  2. You create a new create-react-app by cd’ing to the correct folder, then running
    create-react-app my-app

Customization

Now that we’ve successfully installed and created our app, we can customize the configuration

  1. First, we need to eject the app so the webpack config is exposed and editable.
    npm run eject

    Reminder: This is very permanent.

  2. Install React Hot Loader by running
    npm install --save-dev react-hot-loader@next

    At the time of writing, this installed v3.0.0-beta.6

  3. In the package.json file, we need to add
    "plugins": [
    	"react-hot-loader/babel"
    ]

    so the babel object now reads:

    "babel": {
      "presets": [
        "react-app",
        "stage-1"
      ],
      "plugins": [
        "react-hot-loader/babel"
      ]
    },
  4. In the webpack.config.dev.js file, we need to add
    'react-hot-loader/patch'

    as the first entry point in module.exports.entry. It will now read

    module.exports = {
      ...
      entry: [
        'react-hot-loader/patch',
    ...
  5. In the index.html file, we need to add an import of AppContainer.
    import {AppContainer} from 'react-hot-loader';
  6. Then we need to change the default render function to be
    const rootEl = document.getElementById('root');
    
    ReactDOM.render(
        <AppContainer>
            <App />
        </AppContainer>,
      rootEl
    );
  7. Finally, we need to add in the call to the NextApp when App (or any child) is changed.
    if (module.hot) {
        module.hot.accept('./App', () => {
            const NextApp = require('./App').default; // eslint-disable-line global-require
            ReactDOM.render(
                <AppContainer>
                    <NextApp />
                </AppContainer>,
                rootEl
            );
        });
    }

Hit me up on Twitter if you have any questions, comments, or if you have a better/easier way to add hot reloading to create-react-app.

So You Want to Change the Gravity Forms Form Tag…

I had an interesting request from a client today. They use Pardot to integrate with the forms on their old website, and wanted to do the same with their new WordPress theme. We’re using the always spectacular Gravity Forms for the forms on the site.

I did the integrations, and we got an error.

The form enc type appears to be incompatible with our pardot form handler according to this article:
 
Wrong Enctype
Pardot form handlers can only be integrated with forms using an empty enctype attribute or an enctype of application/x-www-form-urlencoded. Pardot doesn't accept an enctype of multipart/form-data.

I didn’t realize (but now it makes perfect sense) that Gravity Forms defaults to enctype=”multipart/form-data”. I scoured the Gravity Forms settings, looking for a way to switch that to the correct enctype without any luck. I hit up a good friend of mine, Rob Harrell, on Twitter, asking if there was a way to edit the form. Thankfully, there is. He sent me this page about a filter a developer can use the edit the form tag output by Gravity Forms.

I added this code to the functions.php file to change the enctype of the form:

add_filter( 'gform_form_tag', 'form_tag', 10, 2 );
function form_tag( $form_tag, $form ) {
    if ( $form['id'] != 1 ) {
        //not the form whose tag you want to change, return the unchanged tag
        return $form_tag;
    }
    $form_tag = preg_replace( "|enctype='(.*?)'|", "enctype='application/x-www-form-urlencoded'", $form_tag );
    return $form_tag;
}

Breaking down that code:

//Enter the ID of the form you want to alter here:
if ( $form['id'] != 1 ) {

//Alter the 
tag however you like here: $form_tag = preg_replace( "|enctype='(.*?)'|", "enctype='application/x-www-form-urlencoded'", $form_tag ); //This can be just about any replacement you want, or you can just return a new string that is the new form tag return '

Pardot is picky about the form they integrate with, and thankfully the Gravity Forms developers made it possible to alter the <form> tag however we need to.

Normalizing addEventListener and event Between Modern Browsers and IE9

Modern browsers make using event listeners very easy. The API is normalized across all modern browsers (Chrome, Firefox, Safari, IE10+, iOS, Android), but if you’re stuck supporting IE9 on a project like I am right now, some elbow grease is needed to make your event listeners work the same across browsers.

Functions/Snippets For IE9

//Add an event listener to an element
function listen(element, event, callback) {
    if(element.attachEvent) {
        element.attachEvent("on" + event, function() {callback.call(element);});
    } else if(this.addEventListener) {
        element.addEventListener(event, callback, false);
    }
}

//If you prefer adding this function to the element prototype, use this syntax
Element.prototype.listen = function(event, callback) {
    if(this.attachEvent) {
        this.attachEvent("on" + event, function() {callback.call(this);});
    } else if(this.addEventListener) {
        this.addEventListener(event, callback, false);
    }
};

//Doing this allows you to add it to the NodeList prototype too
NodeList.prototype.listen = function(event, callback) {
    for(var i = 0, l = this.length; i < l; i++) {
        this[i].listen(event, callback);
    }
};

Inside the callback function, some more work needs to be done:

function callback(event) {
    //Get the event in both IE9 and modern browsers
    var event = event ? event : window.event;
    
    //Get the target of the event (in listeners like click)
    var target = event ? event.target : window.event.srcElement;
}

Finally, you can use the event to stop propagation using this function:

function stopPropagation(event) {
    if(event.stopPropagation) {
        event.stopPropagation();
    } else {
        event.returnValue = false;
    }
}

Calculating an Element’s Distance From the Top of the Document

For the times that I need to know how far an element is from the top of the DOM, not the top of it’s parent, I use this helper function.

//Loops through all parent nodes of an element to get it's distance from the top of the document
function getDistanceFromTop(element) {
    var yPos = 0;

    while(element) {
        yPos += (element.offsetTop);
        element = element.offsetParent;
    }

    return yPos;
}

This function returns the number of pixels the top of the element is from the top of the DOM.

Interviewing Recruiters

I get emails and messages from recruiters two or three times a week. On top of that, I help lead the local developer meetup, so I get contacted by recruiters to help introduce them to the appropriate developers for their open positions.

I don’t mind being contacted by recruiters, and if I can help them, I love to. I know enough developers that I can usually point them toward at least one prospect.

That said, I ask something in return. I’ve built a list of 11 questions that I ask them to answer before I pass the request on to developers in our community. Read More…

Absolute Positioning and Horizontal/Vertical Centering

Horizontal centering of an element is something that we, as web developers, do every day. It’s often an integral part of our designs. It’s easy with text and with relatively positioned block and inline-block elements. The problem arises when we try to center an element (horizontally or vertically) that is absolutely positioned. When I teased this post on Twitter, I received at least 10 replies saying that’s easy if you know the width of the child element. But that isn’t a limitation. Even if you don’t know the width, fear not! It’s actually really easy. *gasp* Read More…

Hooking Up to the window.onscroll Event Without Killing Your Performance

Waterfall and FPS chart
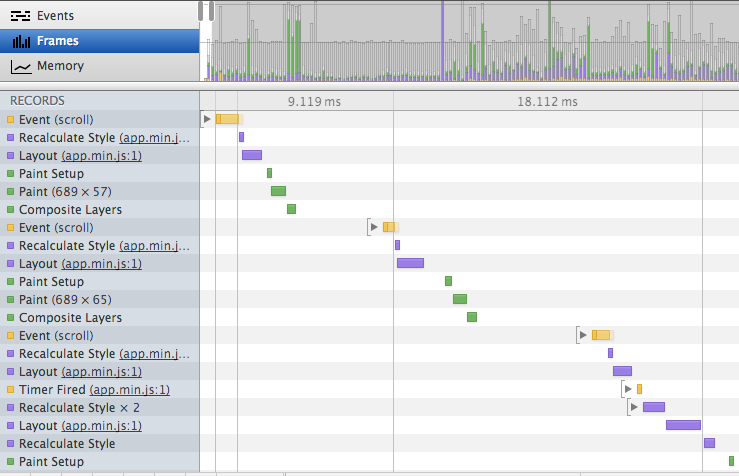
This week was my one-month anniversary at Lemonly, and in that month, I’ve used more onscroll event hooks than I have in the last 15 years of development, and for good reason. It’s a great way to add flair, track progress, or get parallax-y. If you don’t do it right, it’ll crush your site’s performance and irritate your users. So what’s the best way to hook up to the window.onscroll event and still maintain a reasonable frame-per-second rate when scrolling? Read More…

If Everything is !important…

The past couple of days, I’ve been working with .NET controls that we purchased from a company called Telerik. They are, for the most part, OK. But as soon as you try to edit them at all outside of their theme editor (which is just about the most painful piece of shisoftware to use that I’ve ever come across), the entire world falls apart on top of you.

Today, I had the fun task of making their editor size dynamically. GOOD LUCK WITH THAT. This is the specificity of the default stylesheet for the editor:

The worst CSS I've ever seen

This is among the worst (if not, the worst) CSS I’ve ever seen. If you’re keeping score at home, that’s FIVE !important’s in one element’s style. I don’t know about you, but I’d have a serious discussion with whatever developer thought that was a good idea. Instead, Telerik shipped it. *facedesk*

Next time, Telerik, fix the problem instead of hacking around it.

Update: I was able to override it. If you’re keeping track at home:

.RadForm_MetroTouch .imagePreviewer #imageMultiPage #propertiesPage {
    height: 100% !important;
}

Introducing keycoop.com, A New Responsive Website

A new keycoop.comI launched a new website this week, keycoop.com. Go ahead and click on the link. Check it out. I’ll wait for you to come back. 🙂

Welcome back! This was a fun site to code. A few of the more interesting aspects include:

  • The main menu uses a 2D transform to give it a similar diagonal look to the logo.
  • If you’re in Chrome, you get to see a little eye candy as the hero image fades from 100% desaturation to 0%. I love CSS3 filters.
  • IE8 support is limited to functionality and a constrained single-column layout.

I was the front-end developer and UX manager on this project. That means I wrote 100% of the HTML, CSS, and JavaScript that wasn’t generated by our CMS.

As always, a shout out to the ever-impressive Emily Robinson for a beautiful design.

Love the site? Hate the site? Let me know what you think in the comments or on Twitter.